Users
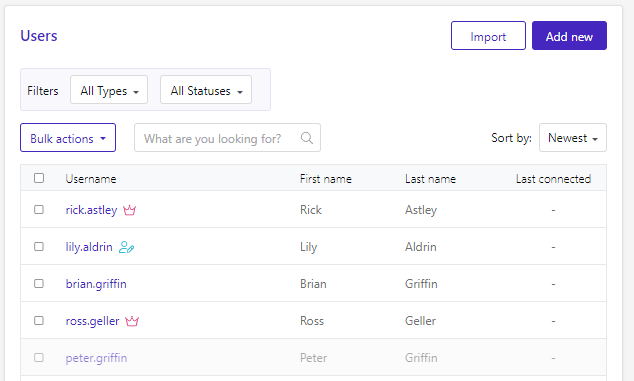
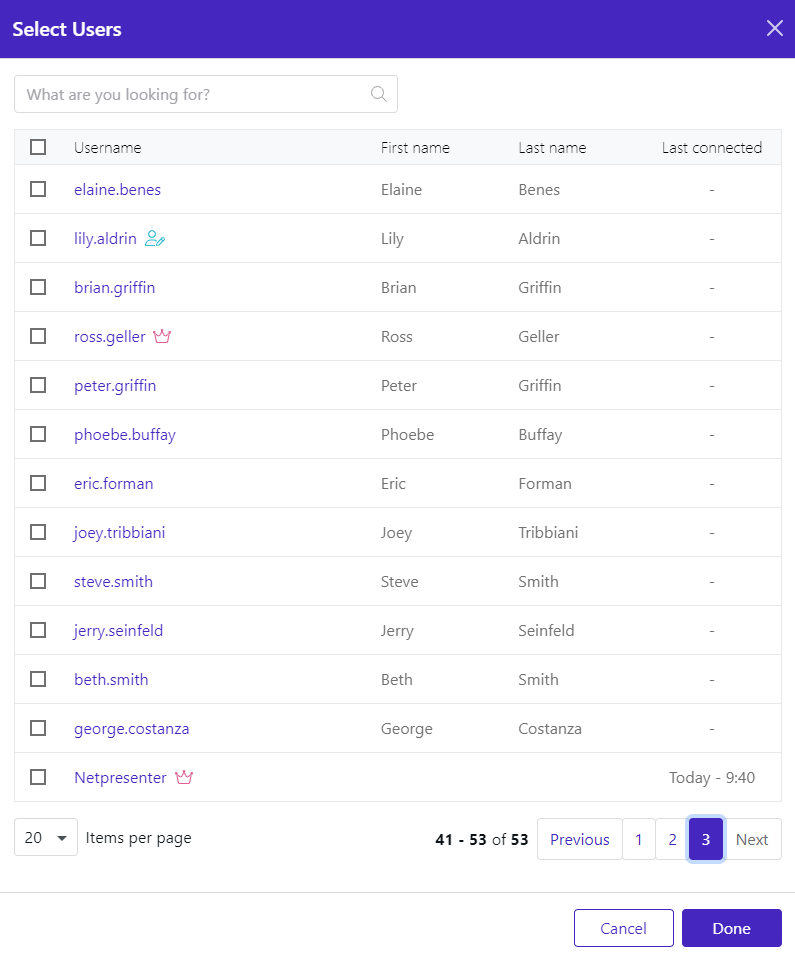
When you first open the Users screen you get a lot of information. Next to the username, first name, last name, and the last time they connected you can also see a couple of icons. These tell you the permissions a user has:
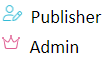
They also tell you if the user is imported/updated from an external source:

The overview also shows you if an account is active or not. Peter’s account is disabled in the example below.
Creating Users
Users can be added to the Content Hub in multiple ways. They can be created manually; they can be loaded from your Azure environment, or they can be added via a CSV file.
Creating users manually
Go to Users in the Settings screen and click the “Add new” button. Complete the user form with all the details you want to provide.
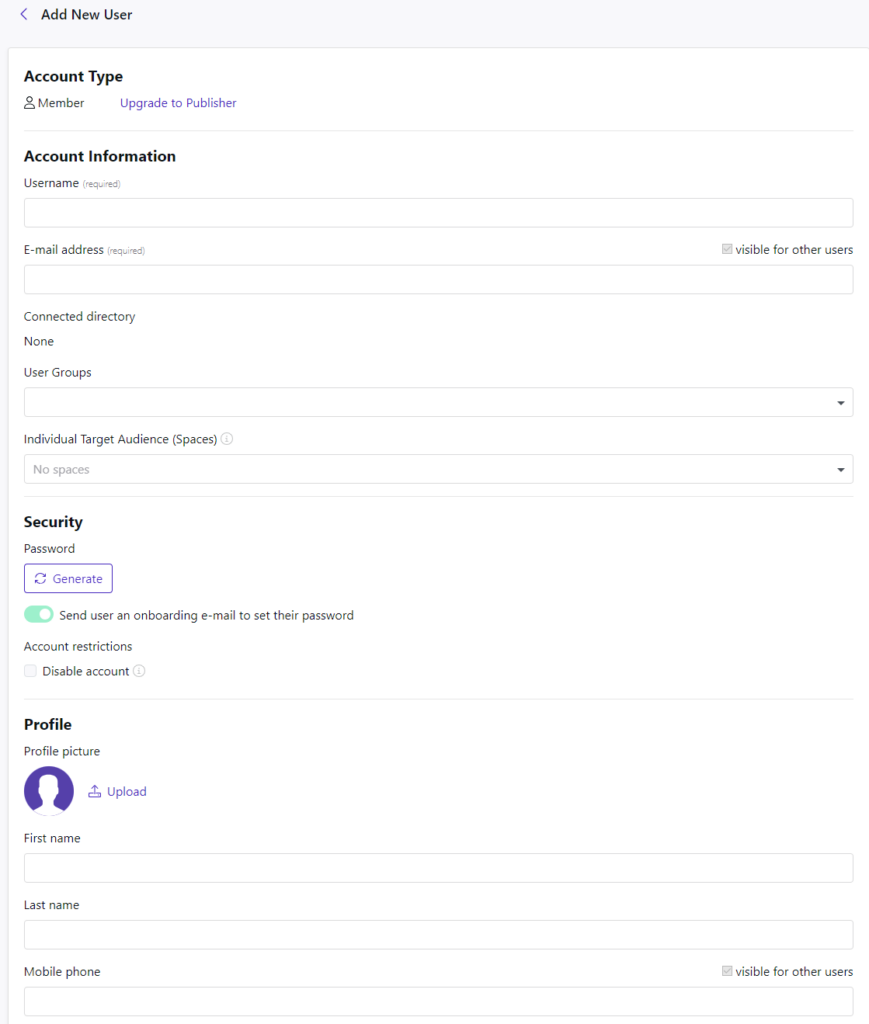
If you are not using the automatic onboarding option, you can click the “Generate” button when you get to the Password option. Make a note of the username and password so you can inform the user once the account is set up.

Make sure to add the user to any Groups they need as well. Any groups that use a rule are added automatically after the user is created.
Click the “Add new User” button.
Importing users from your Azure AD
When your Content Hub is connected to your Azure AD users are loaded automatically. There is no need to add them manually. See our Azure AD documentation to set up the connection.
Importing users using a CSV
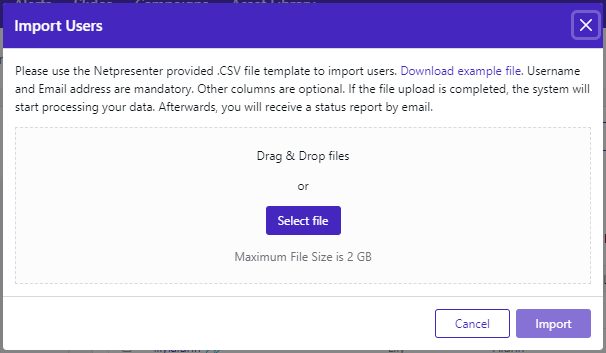
At the top of the Users screen you also see an Import button. This allows you to add users using a CSV.

This brings up the Import screen and allows you to download an example file.
You could for instance export users from your local AD to a CSV using a PowerShell script:
# Import the Active Directory module
Import-Module ActiveDirectory

# Define the output file path
$csvFilePath = "C:\Path\to\output.csv"

# Define the CSV header
$header = "username", "email_address", "first_name", "last_name", "biography", "mobile_number", "work_phone"

# Get all AD users and select the desired properties
$users = Get-ADUser -Filter * -Properties EmailAddress, GivenName, Surname, Description, MobilePhone, OfficePhone |
         Select-Object SamAccountName, EmailAddress, GivenName, Surname, Description, MobilePhone, OfficePhone

# Export the users to a CSV file
$users | Export-Csv -Path $csvFilePath -NoTypeInformation -Delimiter "," -Encoding UTF8

# Prepend the header to the CSV file
(Get-Content -Path $csvFilePath -Raw) -replace "`r`n", "`n" -replace '^"','' -replace '"$','' |
    Set-Content -Path $csvFilePath

# Display success message
Write-Host "Users exported to $csvFilePath."
This script exports all users from the AD and needs to be run on one of your AD servers. Make sure to clean up the list, removing any service accounts or ex-employees.
Upgrading users to Admin or Publisher
Once a user is in the User list, he/she can be upgraded to a Publisher or System Admin account. To do this open the user details and click the “Upgrade to publisher” button at the top of the screen.
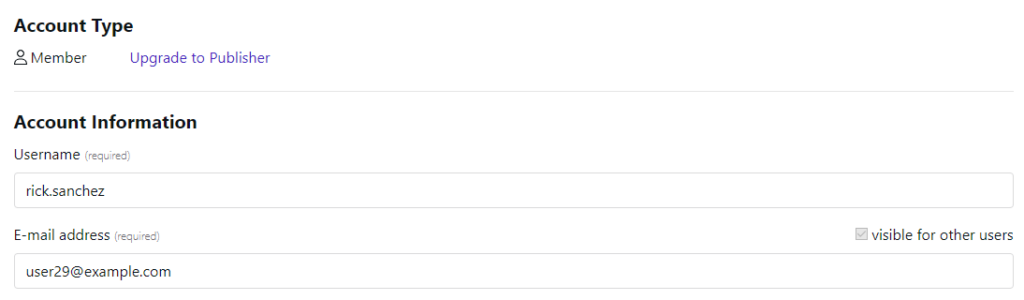
This gives you a couple of new options when you look at the user screen.
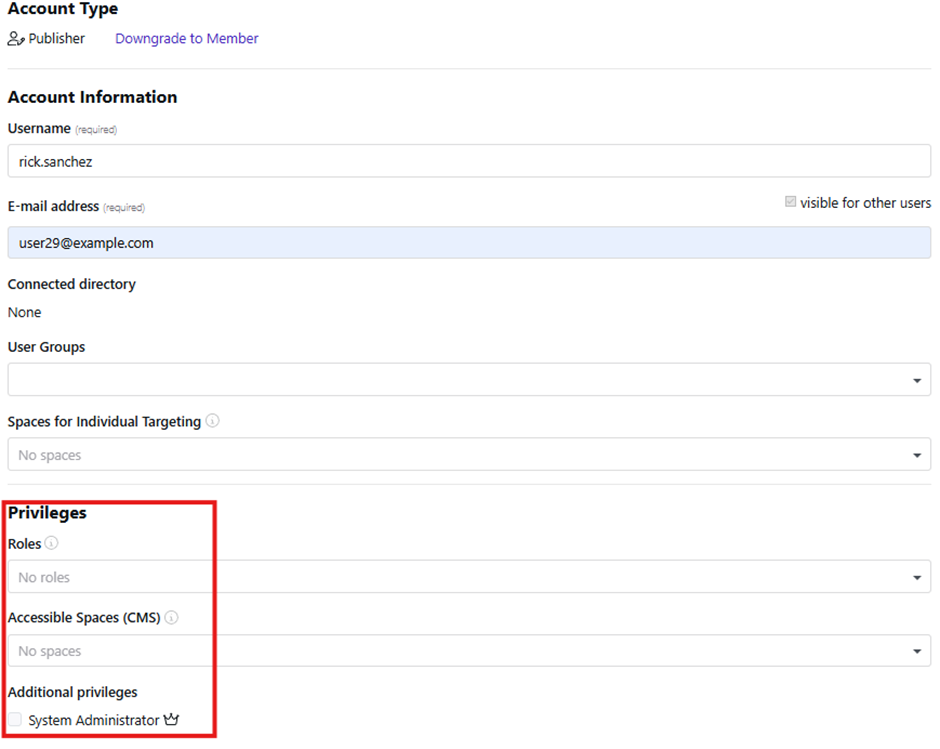
- You can assign roles to specific content parts the user is allowed to publish to.
- You can add the Spaces (Additional Spaces(CMS)) where the user has publishing permissions.
- You can upgrade the user to Admin so the user can assist in managing your Content Hub.
Removing a User
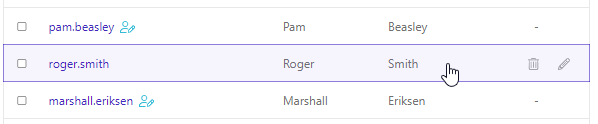
To remove a user simply hover over the user and click the trashcan icon
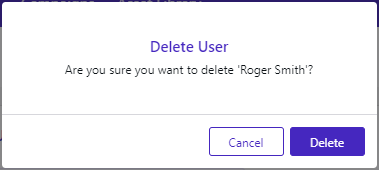
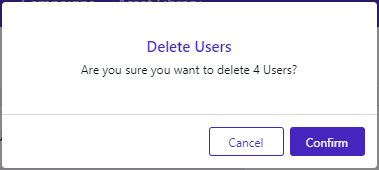
You will get a confirmation screen before the user is removed
To remove multiple users at once you can select the users and click the “Bulk action” dropdown. This will show you the Delete button.
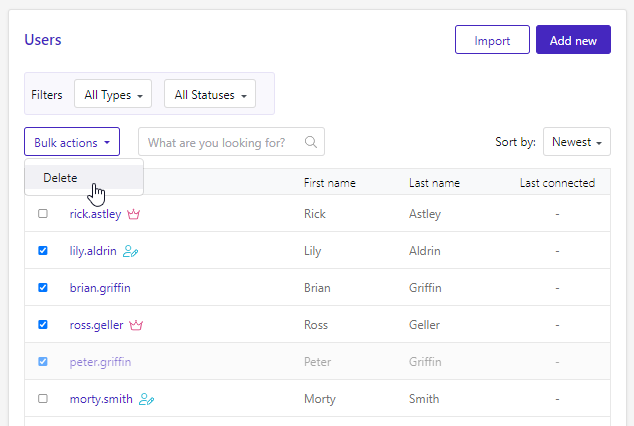
This will also show you a confirmation screen before these changes are finalized.
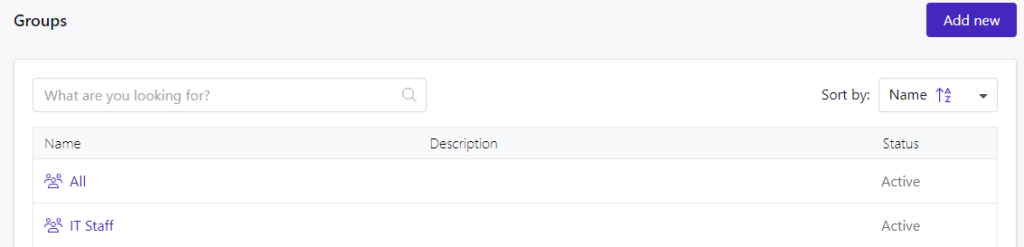
Groups
Within this view you can search for, sort, and create groups of users.
By clicking the ‘Add new’ button, you will arrive in a new view where you can start creating your new group.
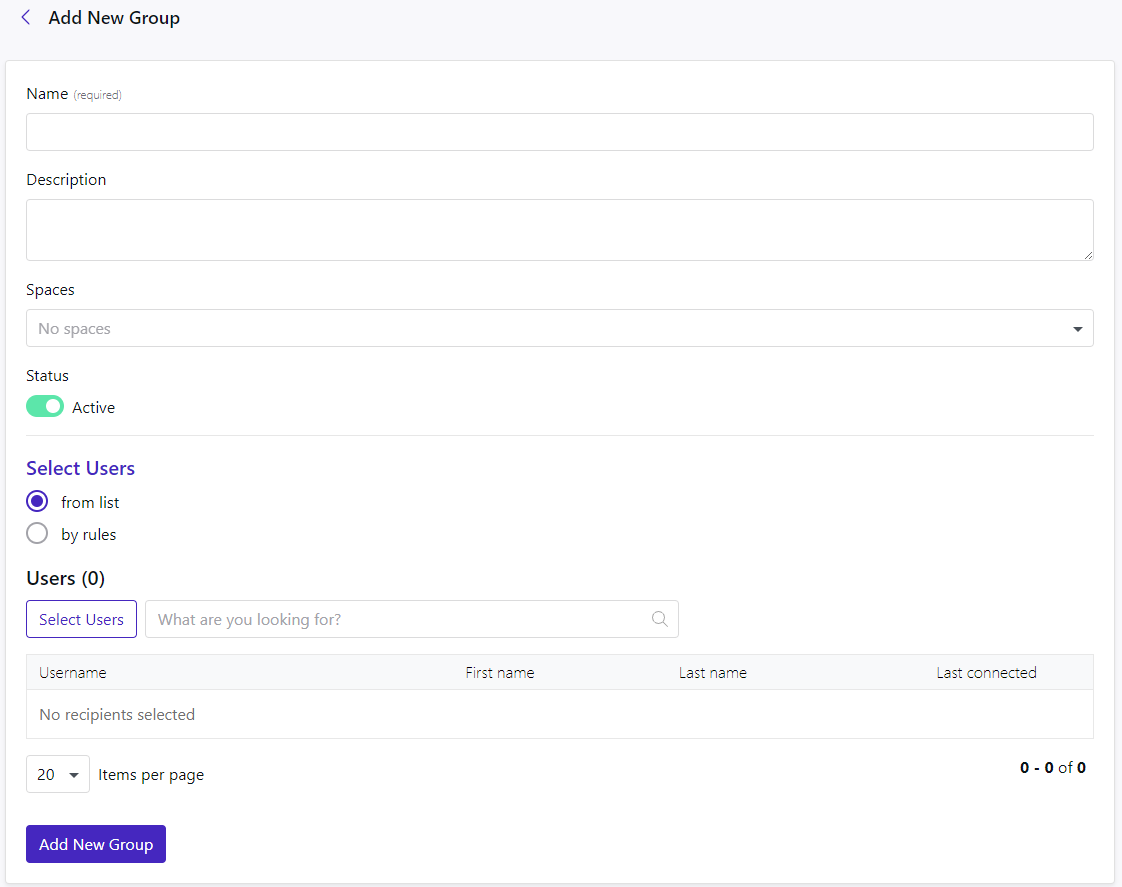
A name is required for the new group. A description is optional.
You will need to add this group to a Space so it will be available as an audience when articles are created.
The groups can also be set to inactive prior to adding it to the list in case it needs to be activated at a later stage.
The recipients of the group can be added via the player list.
Or users can be added to a group via rules.

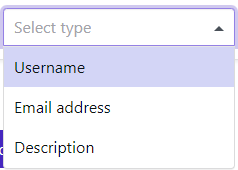
A rule is made of 3 parts. A type, an operator, and the value of the operator.
The type can be a Username, email address, or description.
The operator is what you would like the type to be compared to. Does it need to equal, not equal, start or end with, or does it need to contain or not contain the value behind the operator?
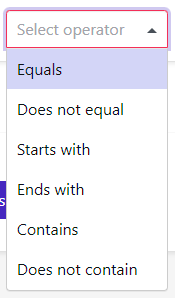
In the final field, you will need to fill in the conditions that need to be met. If you had selected ‘Email address’ as the type and ‘Ends with’ as the operator, you could fill in your @ as its value.

The option to enforce case sensitivity can be activated if desired.